We Need 1 content uploader..@0.001$ per 1000 views.
contact Personally +sharad rana
Web Based Tools to Resize
Image without loosing
Quality
1.Kraken.io :
JPEG, PNG, GIF, SIV are some of the
image formats that can be compressed with
this online application. This reduces the
image to a quite considerable point without
losing the image size.
This application is also available in Chrome
and Firefox extensions
2.Imageoptimizer.net:
After uploading the image from your
computer, give the size of the image and
quality you wish to have after processing.
This provides only some control of the output
and compression ratio But Greatly Helps
to Resize Image without loosing Quality.
3.Smush.it:
Smush.it is the best and popular online
application you can have to compress
images. It is present with an up-loader as
well as URL box to have the image. In this
you will not be provided with the ‘enter’
option to enter the image quality as that of
previous one because it automatically
optimizes the image by compressing it to a
limit.
4.Compressjpg.com &
Compresspng.com :
I would suggest you to have these
application, for more control of the image
quality. A slider appears as soon as you
upload an image to auto control the quality
of the last image. A preview panel is provided
for showcasing the changes according to the
quality slider change. So before downloading
the image you can have the review of your
final image. This application is available on
different domains for JPG and PNG images.
5.Punypng.com :
This application is available to compress the
PNG files. Upload an image and you can get
a compressed size of the image. Besides
this, tinypng.com , a quick tool to compress
the PNG images to the best level without
affecting the image quality.
Desktop tool to Resize Image
without loosing Quality
If you need a Desktop tool to do this task
then i would suggest you to have PNG
Gauntlet as your first choice, You will
need .Microsoft Net Framework 4.0 to run
this tool on your Windows.
You won’t Face any difficulty in Using this
tool as it is very User Friendly. While
Optimizing the images PNG Gauntlet will
show you older size and Optimized size of
the image. this Program is not that Fastest
at it work but Usefull.
VLC Media Player Have the Capability to Play
Videos with all most all Video Formats ,
Probably this is the One reason Why VLC
media player is the most Prefered Media
player, But Do you know that We Can
even Watch Youtube Videos in VLC ? Yes we
can, We do not require Browser to Watch
Youtube Videos, VLC will do that job for you
very Well. I already Shared 5 Cool Youtube
Tricks that You Must Know
You can not only Watch single Video in VLC
but also Watch Youtube Playlists in VLC to
watch them in Sequence,Some More
Advantages of Watching Youtube Videos In
VLC Media player are:
Watch Youtube Videos without Ads,
Means no Disturbance While Watching
your Favourite Video.
Use Loop Button To Watch a Video
Again and again Many times.
Increase or Decrease the Speed of the
Video
Take Snapshots of any particular
Screen of a Song or Movie.
How to Watch Youtube
Videos in VLC Media Player
Now let us Get Started With Steps to Watch
Youtube Videos In VLC, Follow the Below
Simple Steps.
Step 1: Open VLC media player, Click on File
> Open Network Or Simply Use CTRL+N Keys
to Open up Network URL Dialog box.
Step 2: Open Youtube, Navigate to Whatever
Video you want to Play in VLC, Copy the Url
of that video and Paste it in the Dialogue
Box. and Click on Play .
Step 3 : Enjoy Your Video.
Simple Enough hah, Now Let us see How to
Watch Youtube Playlist In VLC Media Player.
Step 1: To Watch Youtube Playlists in VLC
we will be Using an addon, So Click here to
Goto the Downloading Page of the VLC
addon Called VLC Playlist Parser. Make sure
you have Latest Version of VLC Running on
your system.
Step 2: Download the addon, Copy it and
Paste it in Videos Installation folder which in
most cases would be C:\Program Files
\VideoLAN\VLC\lua\playlist.
Step 3: Everything is done, Now Open VLC,
Press CTRL+N Paste Video Playlist URL
Which need to be Public. Click on Play and
Enjoy all the Videos.
I Just Hope this tutorial on How to Watch
Youtube Videos in VLC Media Player Helps all
you Youtube Lovers.
Recently While Downloading Asphalt game
on my Smartphone I got an Error 498 in
Google Play Store. To be Exact, the Error
Reads “Error 498 has occurred while
communicating with the server“.
I Tried again but the Same Error Again. After
Few Tweaks i was finally able to download
and Install Asphalt on my Phone.
Because i Faced this error in Google Play
store, i though there will be many other
people facing the same error and so this
Guide on how to Fix Error 498 in Gooogle
Play store.
Here on this Page i will be sharing few
Methods that will help you to get rid of it.
Though any one listed Method will not work
for Everyone to Get rid of Google Play Error
498 because there are different reasons that
are responsible to cause this error.
Causes of Error 498 in Play
store
There are Few things that causes this Error
on your Smartphone while you try to
download any app from Google Play store.
The Most common issue is the Size of
Device’s Cache Partition. You will get
Error 498 in play store if you try to
download apps that are larger in size
then your Device’s Cache partition.
For Eg: Your Cache partition is of 30M and
you try to download an app with Size 35M
then you might get this error. Usually Play
store have issues when downloading apps
that are large in size.
Another Reason is Google Servers from
where you are trying to download the
apps might be under maintenance. So if
you are downloading an App and you
get Play store erro 498 message then
Server may be the issue. Just wait and
try to download it again.
So these were just Couple of Possible
Reasons for a User to get this Error in Google
Play store, Now let us see Some Possible
Ways to Fix it.
5 Ways to Fix Google Play
store Error 498
Method 1: Clearing Cache
Most Common Reason you might be facing
this Error is because of Cache, so i will start
the Methods list by Recommending you to
Clearing the Cache.
To do So, Just navigate to Settings >
Applications > Manage Applications > Select
Google Play store > Clear Data & Clear
Cache.
Now Try and download the App if Cache was
the problem and clearing it solved the Issue
for you. One more reason of listing this
method on top is this worked for me and i
was able to download the game easily after
clearing the Cache. Though the Solution for
all might not be the same so try below
methods too.
Method 2: Use Wifi to
Download.
Many a times your Internet Service Provider
(ISP) Creates this Problem of Error 498 and
many other Errors. so Try and get access to
Wifi somehow and try to download the app
thats giving you the Error.
Method 3: Adding New Play
Store account.
You will need to Add a new Play store
account inorder to fix this Error. Go to
Settings > Accounts > Add New Account >
Click on Google > Next > Enter email > Done.
After setting up new Play store account try to
download the same app and see if this have
Solved your Problem.
Method 4: Connecting with
Computer:
One of my Friend reported that he fixed Error
498 by installing apps from Computer to
Smartphone. You just need to connect your
Smartphone to Computer Using USB Cable .
then goto Google Play Store using your
Favourite Browser on your Computer. Then
Search for the App which was getting error on
your Smartphone.
Click on the Preferred Result that you get,
next On the App page you will see Install
button . Click it to Download that app On your
Smartphone. No it will not Install on your
Computer. it will Install on your Smartphone.
Just make sure your Smartphone is
Connected or else you will not See Install
Button.
Method 5: Uninstall &
reinstall Google Play store:
If your Phone is Rooted then You might just
want to Uninstall and Then Reinstall Google
Play store so that to make sure that you
actually get rid of Error 498 in Google Play
Store. If any of the above Listed methods
don’t work for you then go for this one and
you will fix it for sure.
So these were 5 Methods to Fix Error 498 In
Play Store . I hope this helps you to get rid of
this error and you can again download your
favourite app from play store just like before.
If these Helps then please don’t forget to
spend few seconds and Comment below
which Method solved the Issue for you. Or If
you have any other way to get rid of this error
message in play store then feel free to share
it in Comments below.


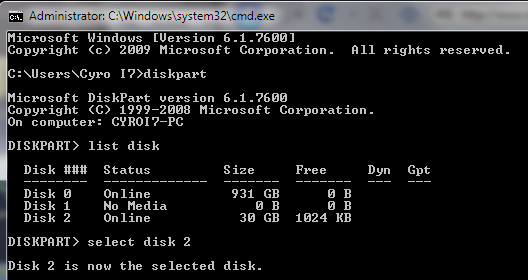

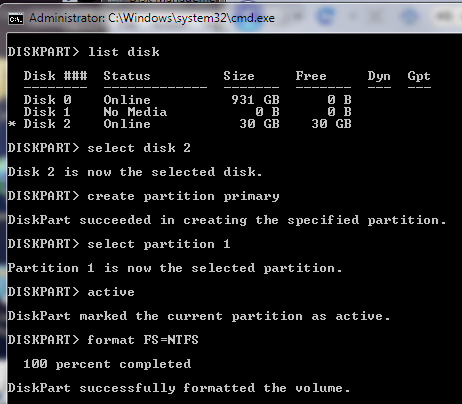
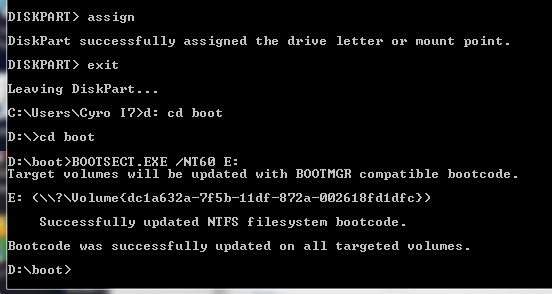


cd boot gives me is not recognized!! what should i do ???
it showed
c:\windows\system32\f:cd boot
then it showed ‘f:cd’ is not recognised as an internal or external command,operable program or batch file.
So, your command will bec:\windows\system32\f: cd boot
notc:\windows\system32\f:cd boot
THEN
type ‘cd boot’
right –> f: cd